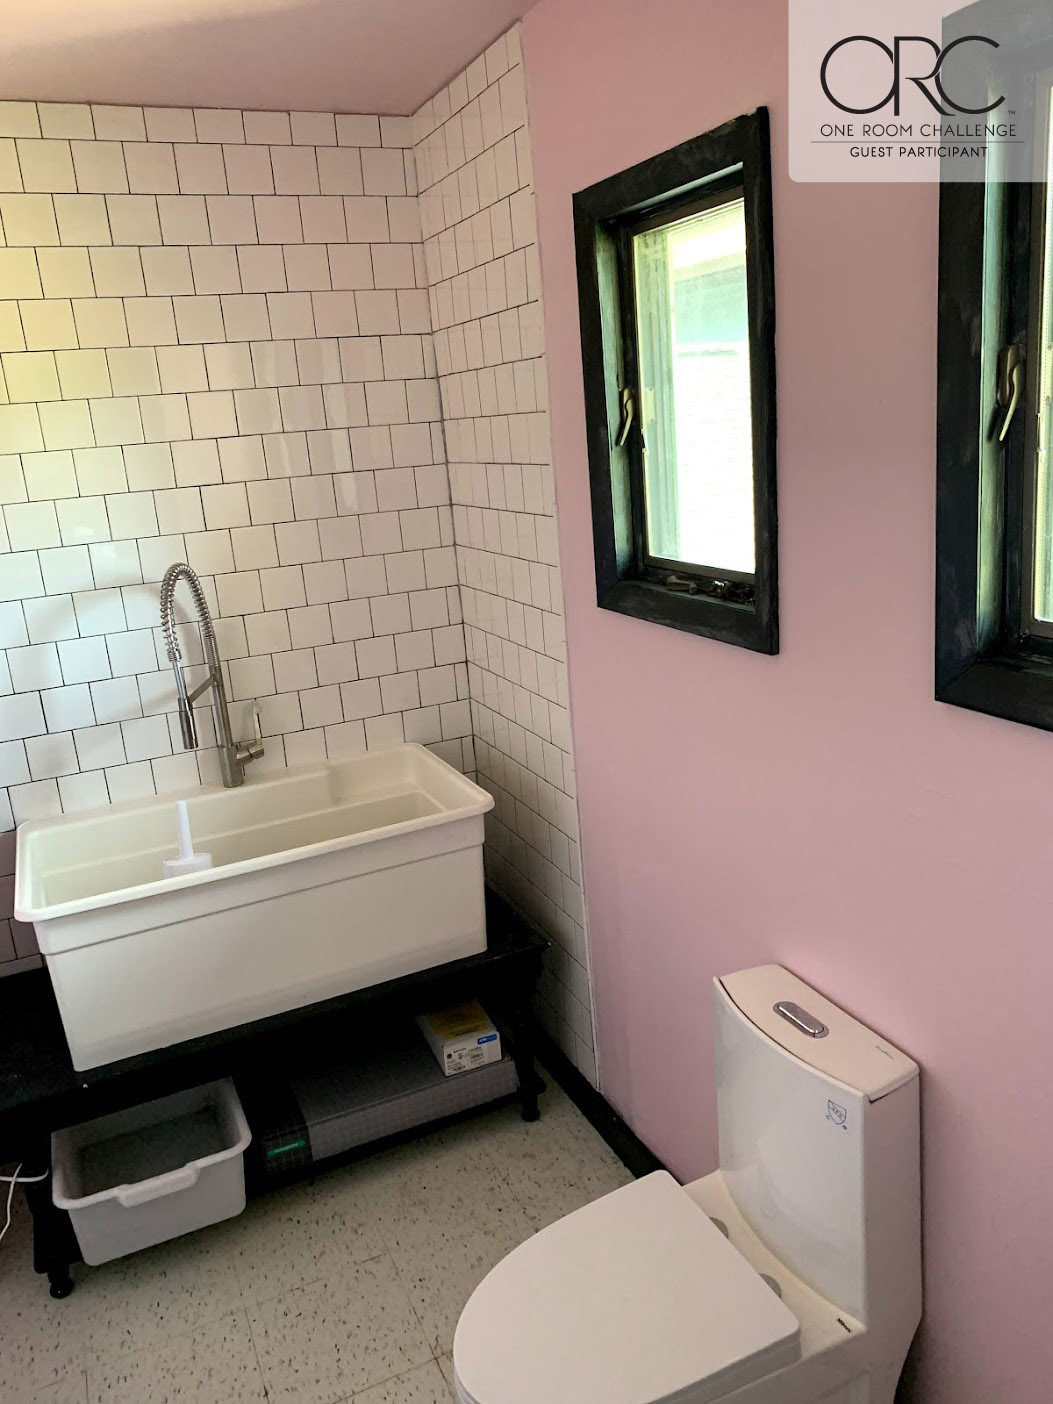
What's going into the bathroom renovation? Name that faucet!

Would you like a studio tour? (Plaza Drive Studio 2013)
October marks my fifth month in my new studio space! Yay! And last week, I finally figured out how to take charge of the remaining disorganization. So, I did a run to Ikea, dropped some cash, and worked a lot on organizing, and now I think everything now has a place! DOUBLE TRIPLE YAY!!
Time for a studio tour!
Let me begin by acknowledging that it is a huge privilege to have a studio space. It’s wonderful to have my own special space to create in. However, please know that quilting is one of my jobs and this space pays for itself. It’s not that I make scads of cash from my etsy shop, teaching, blog, or quilts, it’s that the rent is quite cheap. For comparison, the amount I pay for the studio is significantly less than the amount that Ann Arbor rent goes up if you have a 2-bedroom instead of a 1-bedroom apartment. And my studio rent includes utilities and internet. It’s a really good deal.
Some of you may recall from my brief post when I moved studio, I’ve actually got two rooms, one for my etsy shop/office and another for my quilting studio. Today, I’m sharing the quilting studio. So if you’re wondering where my books, computer, or completed quilts are: they are in the office. I’ll show the office in a few months when it’s in better shape (it’s overfull right now).
Having moved studio a few times, I’ve figured out a few things about how I work and how to keep myself happy, which I figure might help anyone setting up a workspace to hear about. Maybe my years of trial-and-error can help you out! Also, if you’re trying to make a small space or a shared space work for you, check out Katie’s Livudio: she is making a corner of her living room work for her (and she’s written a book and everything from this set-up)! I think the key is knowing what you need and finding a way to make it happen.
At this point, if I’m going to be paying rent, I have some requirements for a studio space:
-high-speed internet that doesn’t break the bank
-air conditioning and heat that are under my control
-the ability to turn off all overhead lights (this is a migraine issue)
-windows that let in natural light
-the ability to customize a space with paint
-being able to put screws and nails into the wall.
-a room that is at least 10′ by 12′
I found all of that in my current space, plus I’m next door to Pink Castle Fabrics, so I can pop over for a bit of fabric, a quick chat, or even my favorite form of therapy: making blogger bundles.
If you find yourself in need of a space like this, what I recommend is getting involved with locals who are interested in making. I found my first studio through local etsy connections and this space came to me through Ann Arbor Modern Quilt Guild‘s and Pink Castle Fabrics‘s ongoing positive relationship with Maker Works (an awesome Ann Arbor space that fosters creativity and invention through classes and access to amazing tools like laser cutters, plasma cutters, shop bots, etc!)
Okay, now it really is time for the tour!
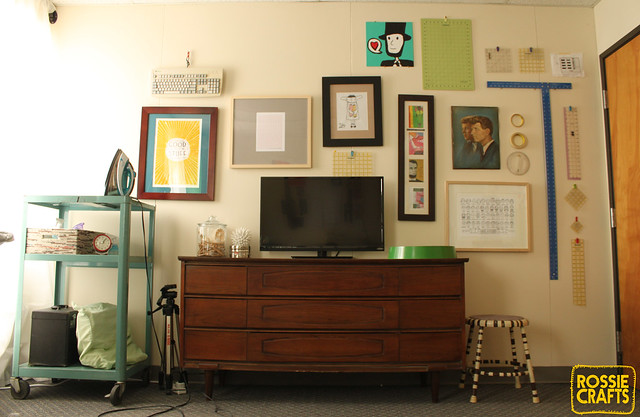
Here’s my favorite view:
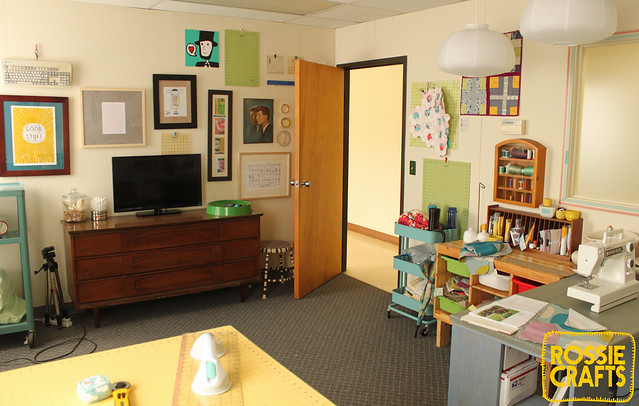
And here is the opposite view, standing in front of the tv:
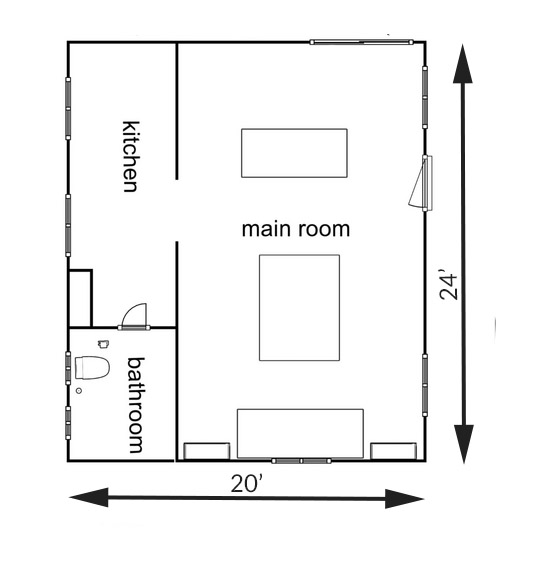
Basic Scheme
I have a sewing station, a pressing station, and a cutting station. Overall, their arrangement in the room is dictated by two things: to take advantage of natural light and to give me a view of the television.
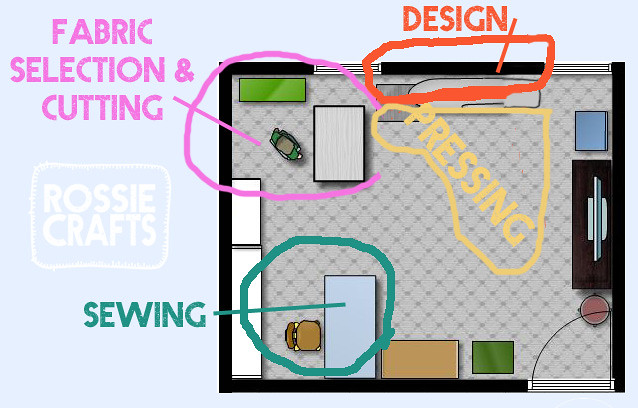
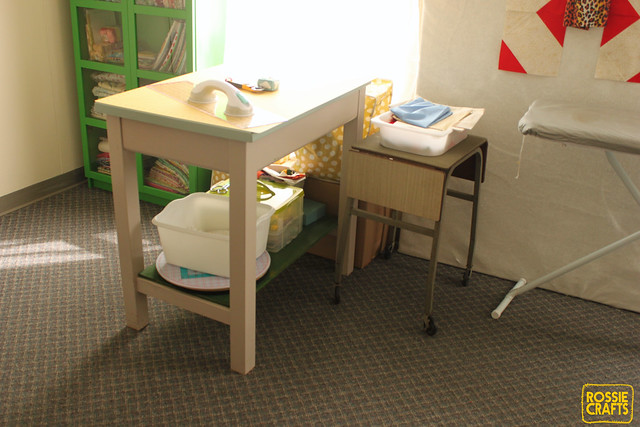
SEWING STATION:
A chair on wheels, a basic wooden table, good lighting, and space to stack up work. Behind me, the shelving holds some leaders-and-enders projects at the ready (read more about those here).
FABRIC SELECTION and CUTTING STATION:
A taller table holding a 24″x36″ rotary mat. This is positioned next to my stash so that I can easily pull out a stack of fabric and search for a specific color. It’s also positioned so that I can easily cut from three different sides of the table.
PRESSING STATION:
A full-size ironing board with an industrial cover. Next to it, a tall cart holds the iron and bottles of water and Best Press. Behind it, the design wall. It’s not unusual for me to pull the ironing board into the center of the room in order to press my work and make the whole design wall usable.
The Details
Okay, now let’s go around the room in an orderly fashion and talk about the furniture and how I use it. If I remember what I paid for something, I’ll let you know what it cost.
(1) The little stool tucked behind the door was once an rusty paint-flecked thing. I got it from a neighbor for free about 10 years ago and painted it and added rubber feet. I keep it handy so that I can reach the top of the design wall.
(2) The dresser was my neighbor’s and I bought it at an estate sale this spring. I love it so much. I use it to store rulers and random tools (though obviously, many of these are on the walls.) My phone and keys go in the green bowl on top. $40.
(3) The television is awesome. It’s a smart TV, so I can use it to stream Netflix when I want videos (I’m watching Wallander and Continuum
right now–love them); the television also streams music (I have a Pandora One subscription). I bought it using my rebate check from my Costco Amex card, so it cost $270 or $0 depending on how you want to count that. Netflix costs about $8/month and Pandora One is less than $40/year. I used to use my laptop for this purpose, but it was never quite loud enough and in this set up, it’s also too small and usually in the other room!
(4) I found the tall A/V cart peaking in at the left at a flea market. I just had to have it. That’s my color, yo! I use it to hold my iron and pressing supplies as well as my back-up sewing machines. When I’m teaching at Pink Castle Fabrics (it’s in the same building), I load this cart up and wheel it over. $30
(5) The wall itself is used to display art (my collection of presidential art features heavily) and to hold rotary rulers and cutting mats. Most of the tools are mounted by putting a 1.5″ screw most of the way into the drywall, then using pony-tail holders to loop through the tool and then over the screw.
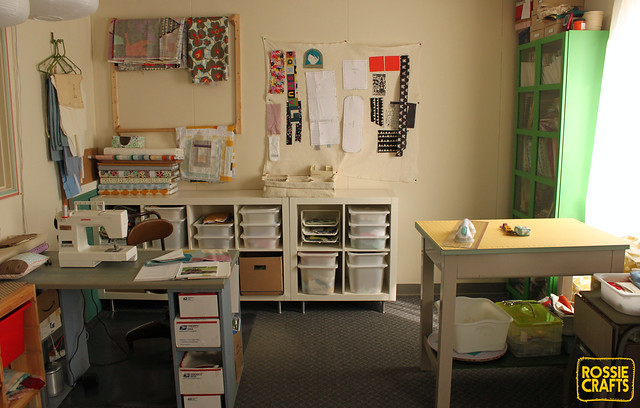
(6) To the right of the door, we can see various Ikea furnishings. The little Raskog trolley from Ikea used to serve the purpose now served by the larger AV cart (holding the iron and spray bottles). Now, it’s job is to safe-guard my purse and hold onto mail I’m not ready to deal with just yet (such as fabric I’m not in the mood to fold and put in the stash yet). I also keep anything for quilting bees, swaps, or round robins in here so that they don’t get lost. I remember being strangely obsessed and stalking this trolley when it first came out because it was so cute and I had to have it and they kept on being bought up as soon as they were stocked (I live 20 minutes from Ikea). It costs $50, but is is a sturdy thing and I love it.
Next to that is a Trofast cabinet from Ikea. I’ve had this for years. It used to live by the back door of my apartment and I kept my boots and hat and mittens and dog leashes in it. It’s also been kitchen storage, which is when it got it’s 2×4 stilts (the garbage bin was under it). Now, it’s got sorted scraps in it and I trimmed the legs down so that it would be the same height as the sewing desk. When I’m free-motion quilting, I move it to abut the sewing table for extra table-top space so that the quilt isn’t falling off the table.
The organizer on top of the Trofast was thrifted for $7 it holds special little bits of fabric. The little wall-mounted cabinet of thread was given to me by Jon’s mom, she bought it at a thrift store.
Okay, let’s look in this corner:
(7) The design wall is constructed from two pieces of foam insulation board and a big piece of batting. It’s very similar to the one that Elizabeth Hartman explains in here tutorial here. $40.
(8) The ironing board is a basic one from KMart, though it’s got a nice firm industrial pad on it from the hardware store. Firm ironing pads are best for preventing distortion while pressing fabric and the industrial pad doesn’t get stained and icky like fabric ones can.
(9) Between the ironing board and the cutting table is a little wheely table. Another little table? Is this overkill? No! The way I work, I always have a stack of fabric I’ve cut from that I don’t want to put away until the project is done. This little table holds that stack. And it hold blocks as I press them and fabric as I cut it, etc. Basically, it enables me to keep my work surfaces clear. I love clear work surfaces.
(10) I found my cutting table at the Property Disposition for the University of Michigan (basically an eternal garage sale of things UM is done with). It cost $25 about 10 years ago; this table was a kitchen table for ages (for food prep) and it’s been painted at least three times while I’ve owned it. It’s quite possibly my favorite piece of furniture. It’s the right height for a taller person to use as a work-station (I’m 5’9″) and it’s the same size as a large cutting mat. I cut a piece of MDF to serve as a lower shelf, which is where I keep my trash bin, my spinning cutting mat, and my sewing kit (with extra needles, rotary blades, etc).
(11) The green cabinet is a Billy Bookcase from Ikea. I bought it last fall when the color had been discontinued and they were trying to get rid of the stock, so it was significantly discounted. It holds most of my stash, though fabric that has been pulled for specific projects and fabrics that are not quilting cottons are in tubs against the wall. $70
(12) Along the back wall are storage units are from Ikea. They are Expedit shelves mounted on Capita legs. I’ve had the longer one for a while, but bought the little one ($40) and the legs this month for ($24 for 8.) The bins are also kind of pricey, but I love them. These are Trofast bins from Ikea. They cost $3 or $4 each and another $1.50 for the lids. I keep projects or fabric pulls or step-outs for specific classes inside them. I’ve had a bunch of different ways that I’ve tried to organize stuff over the years, and these bins are the thing that works for me. They stack and fit nicely in the shelves, but also can be easily pulled out and transported when I’m headed to a local retreat with the guild or to Camp Stitchalot. I’ve been slowly acquiring the bins. This is the stuff that I bought this month and it probably represents the biggest chunk of money spent, since it wasn’t thrifted or on sale, but I finally got me to that 100% organized place, so I think it was worth it!
(13) The back wall has a little design wall (just batting tacked to the wall) which I use to store precious little bits and scraps I don’t want to lose track of. I want to upgrade this design wall eventually to take up as much of that space as possible and have the foam inside so that I can pin things to it.
The wall also has a pair of clothing rails, which I use to hang finished quilt tops and pressed backs, etc. Basically, stuff that I don’t want to get wrinkly and hope to finish soon.
You’ll also spy a hook with clothes hangers on it. You can store an amazing amount of stuff on something like this. It serves much the same purpose as the rail: a way to store things without wrinkling them much.
(14) The sewing table is made up of two legs from Ikea and a top from Lowe’s. I made this with a little help from my friends several years ago…you can read about that here. It’s super solid and wonderful. The legs provide storage for a few more works-in-progress. I’m aiming to reduce my number of WIPs to the number of bins I have in the Expedit shelving units, so hopefully, these legs will empty out soon! Also, you can only sort of glimpse them, but there are two lights hanging over the sewing desk (paper lantern type ones) so that I can have extra light if I work late (though typically, the sun does it all!)
My goals for the future of this space:
1. A bigger/more permanent design wall on the back wall.
2. Eliminate the WIPs from the sewing table legs.
3. Switch to a tile, wood, or cork floor (the carpet is old and I vastly prefer sweeping to vacuuming).
Alrighty…there it is! What do you think? Do you thrive in chaos or crave order? Let me know if you have any questions or want any closeups and I’ll answer them in the comments!
Related Posts
This Post Has 17 Comments
Comments are closed.
Great post! You really have maximized your space. I love an orderly quilting space and have taken some flack for not being a messy quilter, as in, "all quilters are messy". I work in a small extra bedroom and have also maximized the space. I only wish I had a bigger design wall. How nice to be right next to Pink Castle. Diane in Madison
We're supposed to be messy? Oh no! 🙂 I can definitely make a nice mess, but I try to clean it up!
Great space! I like to be organized so I have lots of shelves too, that I bought at a thrift shop or at Ikea in the 'as is' department (i don't mind a few knicks and you can get great deals there). I do get messy as I work so at some point during the project I find time to tidy up so that I can think straight again. I, too, love that I have a dedicated space to work in. It's in an isolated corner of my basement. I only wish I had more natural light or better lighting and space for a bigger design wall.
The only thing I've ever bought from our Ikea's "as is" section is a single coffee mug for $.49. But I always look in there for good stuff, I just come up empty. Natural light is so wonderful, I think I'd have to get those "artificial sun" lamps if I didn't have my windows.
I think it's wonderful. I love organized. I've got two Trofast units myself (and my husband has one in his music studio, and my boys have two in their own private Legoland . . . ). I like that they're real wood — you could paint them if you were so inclined — and they're so crazy useful.
I want that lil blue rolling cart so, so bad, but I really don't have a use in my setup for it. But I keep trying to think of one!
P.S. Far be it from me to suggest that your setup isn't completely perfect for you, but that ponytail holder thing has me perplexed. What about the 3M hooks? Not super chic, but they are extremely strong (several rulers no problem), and no holes in the wall!
I'm not concerned about making holes. I'll patch them if I ever move. Cheap and easy!
1. I just realized you are from Ann Arbor. I grew up just south of Jackson. I knew there was something about you that felt like an old friend. 2. I am so jealous that you have studio space. Granted i have as much at home as you do… but i also have 3 grandchilden that live with me and get into my stuff. 3. I have up to this point been a messy quilter but as I am figuring out how I work and what I need to stay organized, I am getting much more organized. The last quilt I made I put back all of my stash and cut my scraps into precuts before I had the quilt finished thats a major wow! 4. you said cheap rent… in Ann Arbor… even more wow! 5. i have no idea why i numbered my responses… maybe it was in response to your neat and organized space, it is very well thought out.
Oh, haiiii!!! yep, I've been in Ann Arbor for 10 years now.
It's really nice to have a room that no one else gets to go into unless I say so!
I have a rule about not buying fabric when the fabric I already own is a mess, it helps keep me on track!
Yeah, cheap! In Ann Arbor! It's amazing.
I number my emails and things sometimes if I want to make sure that people see my many points…you did have a lot!
Great! I seem to manage to thrive in chaos and crave order-don't know how that works? We are about to move countries and it looks like I'll have space for a sewing room/office for the first time, which is fantastic, so I'm stashing ideas-thanks for sharing yours! Having to go to another place/building would take committed course of action, which might mean you get more done. But not sure I'd get there as often as I snack on sewing at home?
I snack on hand-sewing at home! I wouldn't mind having a studio at home if the dogs were banned and we had the space!
I'm curious where you got the print (painting?) of the Kennedys. Love the setup!
At a garage sale. It is paint on wood. No idea if it was from a kit or if its one of a kind.
One of my requirements for a sewing space is a place for someone to sit and keep me company! I kinda hate locking myself in a room with no one to talk to. I am a very messy quilter (well, a messy person) so my sewing room doesn't stay tidy for long, but it is a sweet space to work in: http://www.flickr.com/photos/margrietta/sets/72157634035655035/ One change I've made since those pictures is the table is a flush surface for my quilting table. I use the Gidget 2, and I love it.
love love love your space. You did a great job at giving us a detailed tour. I love it.
You had me at AV cart.
[…] posts: my recent studio tour Jeni Baker’s blog post on Stash […]